
Help & Advice Centre
There are so many different types of wood flooring out there, it may at first seem a little overwhelming to look at. Matching the right wood flooring to your home or business is no small task, and we want to offer the help and support we can to ensure you make the right choice for your wooden floors.
Engineered Wood Flooring Guide
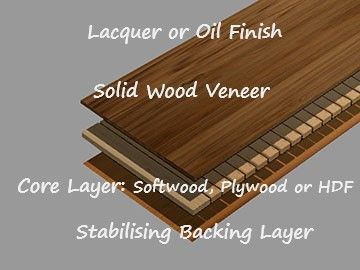
We think Engineered Floors are the best thing to hit the flooring industry since trees grew! Why? Well, engineered floors give the grand look of solid wood, but can be laid in areas where Solid isn’t the best option for the environmental conditions. The bright sparks that have developed these floors have done this by making engineered flooring out of multiple layers to make the flooring more stable.
The top layer is the part that will transform any room: a beautiful veneer of solid wood.
The second layer is the clever bit: a strong, supportive layer that can be made of softwood, plywood or High-Density Fibreboard. All three materials work to prevent the top layer from warping.
This then all comes together with a stabilising back layer. The outcome? A floor which looks stunning but doesn’t warp in areas of changing moisture.
Solid Wood Flooring Guide
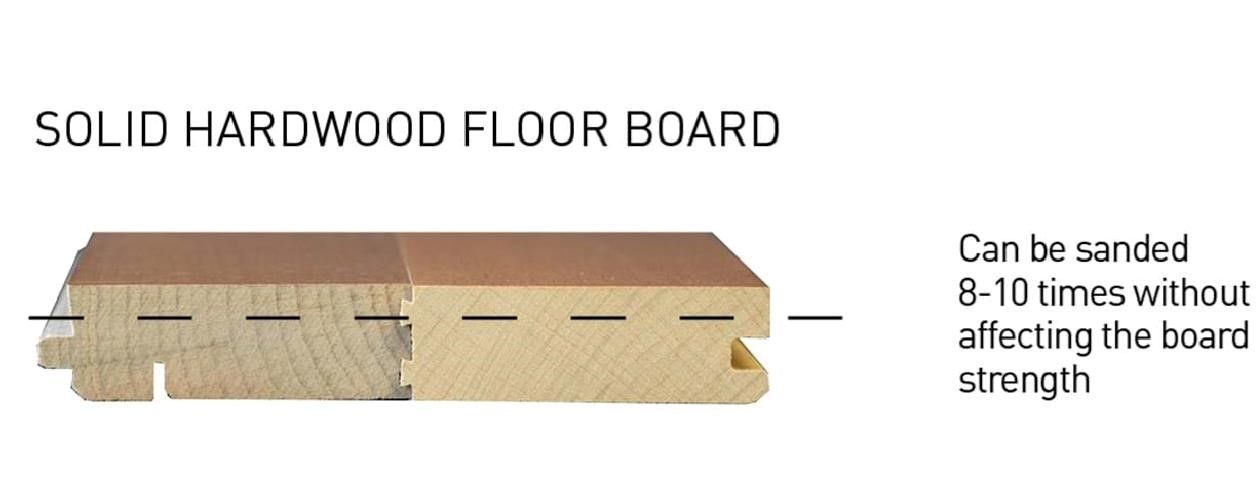
The Lifespan of a Junckers Solid Wood Floor
Because there is a thick Solid Veneer, a Junckers floor may be sanded between eight and ten times. You can sand deeply into the dovetail joint and board strength is unaffected. Ask us for life span comparisons between our floors and other types. It can easily be repaired by a professional contractorors.
Should I be looking for the most abrasion resistant lacquer finish? You may think so, but a combination of hardness and flexibility is better. We achieve this with a combination of two lacquers. Many other boards will have a low cost “UV cured” lacquer with a distinctive “rippled” texture which may be brittle and difficult to over- coat. Here the client’s maintenance costs will be higher and the life of the floor will be shorter.
Do other floors have better water resistance than solid boards? No. Any wood floor will suffer water damage if it becomes sufficiently wet, and synthetic floors will suffer damage if welded seams fail. Junckers coats the stave ends during manufacture to reduce water penetration. See our cleaning and maintenance guides.
Herringbone blocks
Acclimatisation and Storage
Your new flooring must be acclimatized before installation, Engineered for a minimum of 72hrs and Solid wood for a minimum of 120hrs. The flooring must remain in its packaging stored horizontal in the room which it is to be installed into. Please Note the room must be dry and have a constant relative humidity between 45 - 60% as this will affect your behaviour of your floor.
Subfloor Preparation
It is of the utmost importance that the subfloor is dry, clean, solid and flat. You can find appropriate electronic moisture meters in DIY stores; the subfloor must be flat, and the flatness tolerances must be observed. The installer must always and in particular with renovation work check the current status of the subfloor, if it does not meet the requirements stated here extra work will need to be carried out to level the subfloor out, to determine the flatness of your floor apply these tolerances over 1m length the floor must not be more than 3mm difference and over 2m that rises to 4mm.
Please note:
A herringbone design should typically be started from a central axis, using a chalk line or straight edge to mark the centre of your room create the ‘x’ line, then a second line needs to intersect this line at 90° to create the ‘y’ line. Setting this axis up is crucial and its good practice to check all angles and measurements are correct at this stage before any planks are laid. From the ‘Y’ line measure out 27mm each side and mark the floor off with lines ‘A’ and ‘B’ these will serve as guide lines as the ‘Y’ line runs through the centre point of the two planks once they have been joined. From plywood create a starter board, this will need to be the same as the plank length and must be square. Lay the starter board so its top and bottom corners are in line with line ‘B’ and temporarily fix it to the floor.
Full Surface Bond Glue Down Installation
It’s essential the Herringbone floor is fully glued down on the back, including the short edges for the most secure fit. The sub floor must be checked for suitability in all respects as per the information previously stated above - including flatness, soundness and suitable moisture content - with the appropriate equipment and as per guidelines given in B.S. 8201:2011. The moisture content of a concrete / screed sub floor should be checked carefully with an appropriate moisture meter or humidity box/sleeve as per the B.S references above and MUST have a relative humidity value of less than 75% and be in accordance with BS8204: 2004. 9 If the appropriateness of the moisture content of the sub floor cannot be determined or guaranteed, install an appropriate liquid damp proof membrane that is compatible with the adhesive to be used.
Luxury Vinyl Flooring Guide

Our Collections: Glue Down, Click Lock and Looselay
VERO GLUE DOWN PLANK
Our Italian-inspired Vero range offers the highest quality and absolute style. Available in seven stunning colours, with our TrueGrain finish as standard, this striking collection of formats in luxury glue-down vinyl will redefine any interior.
+ TrueGrain finish as standard
+ Mix formats and colours
+ 36 PTV Rating
+ 0.5mm wear layer
Prior To Installation
It is crucial to thoroughly inspect and check the product for any damage, defects, or variations before proceeding with the installation. This inspection should be conducted under adequate lighting conditions.
Here are the key points to consider:
Color and Quantity Check: Verify that the colors of the panels correspond to those ordered and ensure that the quantities are correct. Additionally, inspect the boxes for any visible damage. If there are any discrepancies or visible damage, it is important to address them before installation.
Visual Inspection During Installation: While installing the panels, carefully examine them for any visible defects. If you notice any imperfections such as scratches, chips, or inconsistencies, do not proceed with installing those panels. It is recommended to set aside and avoid using panels that display any visible
defects.
Use Materials from a Single Production Batch: To ensure a consistent shade and appearance, it is advisable to use materials from a single production batch for each installation. Different batches may have slight variations in color, so using panels from the same batch helps maintain a uniform look.
Natural Variation: Some designs may naturally exhibit variations within the pattern. It is important to be aware of this characteristic and consider it during installation. Mixing or shuffling the panels from different boxes can help distribute any inherent variations more evenly across the floor.
Please note that if defects are visible prior to installation, PlusFloor will not assume responsibility for the costs associated with removing and reinstalling the flooring. By proceeding with the installation, it is understood that the installed product is accepted.
Careful inspection and adherence to these guidelines will help ensure a satisfactory installation and minimize any issues or discrepancies.
Suitability
Vero flooring can be installed on various types of subfloors, including concrete, cementitious screed, anhydrite (calcium sulfate), timber, and ceramic tiles, provided they have been properly prepared according to the floor preparation guidelines.
When installing on raised access flooring according to EN12825, it is important to note that the level of flatness described in the standard may not be suffcient to achieve the best aesthetic results for Vero flooring without using a permanent adhesive. Increasing the flatness of the raised access floor beyond the standard requirements will enhance the overall appearance. It is recommended to have a pre-installation meeting with all involved parties to agree on the tolerances and ensure a satisfactory outcome. Vero flooring is compatible with traditional water-based underfloor heating and cooling systems. However, it is crucial to ensure that the subfloor surface temperature does not exceed 27°C to prevent any potential damage.
It's important to note that Vero flooring is intended for indoor installations only and is primarily designed for temperature-controlled office spaces. It is recommended to maintain the air and floorcovering temperature between 15°C and 27°C. Avoid rapid temperature increases of more than 5°C per 12 hours to prevent any adverse effects on the flooring.
In areas where extreme temperature fluctuations and/or heavy traffic and loads are expected, it is necessary to fully adhere the Vero flooring using recommended dispersion or 2-component epoxy/PU adhesive. This ensures optimal performance and durability in such demanding conditions. Detailed instructions on adhesive selection and application can be found in the relevant section.
Construction, and Quality of the Subfloor
Understanding the flooring and construction of the subfloor or base is essential for ensuring a successful flooring installation. It provides crucial information to assess factors such as acceptable humidity levels,
flatness, compressive strength, and tensile strength of the subfloor.
By knowing the characteristics of the subfloor, you can determine the appropriate floor preparation techniques and materials required for the installation process. This may include the use of leveling or
smoothing compounds to achieve a smooth and even surface, as well as the need for moisture barriers to prevent moisture-related issues.
If there is any uncertainty or ambiguity regarding the quality or composition of the subfloor, it is recommended to consult local installation standards and guidelines. Additionally, seeking advice from floor
preparation experts or suppliers of leveling compounds can provide valuable insights and recommendations specific to your situation.
By ensuring that the subfloor is properly prepared and meets the necessary requirements, you can create a suitable foundation for the installation of your flooring material, promoting longevity and performance.
National Regulations and Standards
It is crucial to adhere to the relevant national regulations and installation standards when it comes to site and installation conditions. These regulations and standards are in place to ensure the safety, quality, and compliance of the installation process.
If there is a conflict between the manufacturer's recommendations and the national standard or regulation, it is important to prioritize the more stringent requirement. This means that if the national standard or regulation imposes stricter guidelines or specifications than the manufacturer's recommendations, the stricter requirement should be followed.
By following the most stringent requirement, you can ensure that the installation meets the highest standards and complies with all necessary regulations, ultimately providing a safe and reliable outcome. It is
advisable to consult and refer to both the manufacturer's recommendations and the applicable national regulations to ensure compliance throughout the installation process.
Irregularities in the Subfloor
Indeed, proper preparation of the subfloor is essential for a successful installation of PlusFloor Vero. The quality and condition of the base directly impact the final appearance and performance of the finished floor. Here are some key points to consider:
1. Subfloor Requirements: The subfloor should be hard, structurally sound, flat, smooth, clean, and dry. It should be free from defects and suitable for the intended purpose. Any old adhesives, loose levelling compounds, and chemical substances should be removed.
2. Subfloor Evenness: It is recommended to ensure that the unevenness of the subfloor does not exceed 2mm over a width of 200cm. This helps to achieve a visually pleasing and level surface.
3. Suitable Materials: Select suitable materials for floor preparation, such as plywood and levelling compounds, based on the occupational use of the area. Consult with the supplier of preparative materials and the flooring contractor to ensure the compatibility and compliance with national standards for resilient floorcoverings.
4. Raised Access Flooring: Vero is suitable for installation on all types of raised access flooring according to EN12825. However, to achieve the best aesthetics, it may be necessary to increase the level of flatness beyond the standard requirements. This can be achieved by using a permanent adhesive.
5. Pre-Installation Meeting: It is recommended to have a pre-installation meeting with all involved parties to discuss and agree upon the tolerances and requirements. The type of design, finishing, and aesthetic considerations should be taken into account during these discussions.
6. Design Considerations: Designs with color variation, heavier structure, and pronounced bevels are generally more forgiving on irregular subfloors compared to designs with uniform colors, little structure, and no bevels. Consider these factors when selecting the Vero flooring design for a particular subfloor condition.
The Moisture Content of the Subfloor
In the UK, specific moisture requirements exist for different types of subfloors when installing PlusFloor Vero flooring. Here are the recommended moisture levels for various subfloor types:
1. Unheated Cementitious Screeds: The moisture content of unheated cementitious screeds should be less than 2.0CM% (Carbide Method) and the relative humidity (RH) should be below 75%.
2. Underfloor Heated Cementitious Screeds: For underfloor heated cementitious screeds, the moisture content should be less than 1.8CM% (Carbide Method) and the relative humidity (RH) should be below
75%.
3. Unheated Anhydrite (Calcium Sulphate) Screeds: The moisture content of unheated anhydrite screeds should be less than 0.5CM% (Carbide Method).
4. Underfloor Heated Anhydrite (Calcium Sulphate) Screeds: Underfloor heated anhydrite screeds should have a moisture content of less than 0.3CM% (Carbide Method). For direct-to-earth concrete and stone subfloors, it is essential to have an effective Damp Proof Membrane (DPM) in accordance with national standards for resilient floorcovering installation. This helps to prevent moisture from the ground seeping into the subfloor and potentially damaging the PlusFloor Vero flooring.
Acclimatisation
Prior to installation, it is essential that the Vero flooring is allowed to acclimatise in the designated room or a similar space for a minimum of 24 hours. This time is necessary for the product to reach the appropriate
ambient temperature, which should fall between a minimum of 18°C and a maximum of 27°C.
To facilitate a gradual acclimatisation process, it is advised to store the planks or tiles in straight piles, ensuring they are kept away from any sources of heat, cooling, or direct intense sunlight. This precautionary measure will help achieve the desired gradual adjustment of the flooring material to its surroundings.
Temperature Condition Before Installation
Before proceeding with the installation, it is important to ensure that the ambient temperature in the room falls within the range of 18°C to 27°C. Additionally, the temperature of the subfloor should be maintained above 15°C. These temperature conditions are necessary for the proper installation of the flooring.
Temperature Condition During and After Installation
During and after the installation process, it is crucial to maintain a consistent temperature that does not deviate by more than 5°C per day. It is important to ensure that the ambient temperature in the room falls within the range of 18°C to 27°C. The room temperature should not fall below the recommended 18°C, while the subfloor temperature should remain above 15°C. This temperature stability should be upheld for a minimum of 24 hours prior to installation and throughout the entire installation process.
Underfloor Heating
PlusFloor Vero is compatible with traditional water-based underfloor heating systems, in accordance with standard EN 1264 part 1 to 5. However, it is not recommended to use wired electrical systems unless they are
encased in a minimum of 9mm of suitable levelling compound. It is important to avoid direct contact between the flooring and electrical wired heating systems. The surface temperature should never exceed 27°C. If you have any doubts or questions, it is advisable to seek additional advice.
After the installation is completed, it is necessary to gradually increase the temperature of the underfloor heating system over a period of 72 hours. This should be done in increments of 5°C per day until it reaches the standard operating temperature conditions, with a maximum operating temperature of 27°C. It is important to refer to the manufacturer's instructions to ensure the suitability of the system.